
C5 Corvette Engine Removal
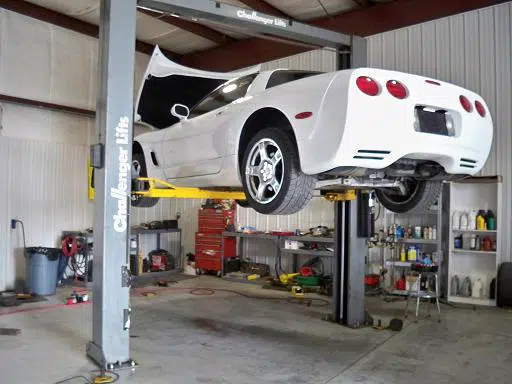

This article includes some notes for dropping the engine from the bottom with a two post lift. You will set the engine cradle on a dolly (or some other kind of support), as one full assembly. I purchased this particular car as a project; it had a bottom end knock. It also needed a transmission rebuild, so I pulled the rest of the drivetrain out as well (Cajundude has a great how-to for that!) In hindsight, it would have been easier to pull the trans/differential assembly first, and then drop the engine afterwards. Pulling the engine first makes things a touch more complicated as the input shaft wants to hang up, and you have little room to slide the engine forward to accommodate it. You can also drop the entire thing at once from engine to rear end, but since it’s so long (front to back, not install time wise) I broke it into two jobs to make it a less daunting task. Anyway, hopefully this will benefit someone who only wants to remove the engine.
This removal is being performed on a 1997 corvette, yours may or may not have the same exact fuel system/alternator bracket/etc.
The tools required are pretty basic – a good set of sockets and ratchets in 1/4″, 3/8″ and 1/2″ drive, flathead screwdrivers, wrenches (gear wrenches come in handy), allen wrenches, prybar, fuel line disconnect tool, and a couple other small things. You’ll also want a catch pan for the coolant you’ll drain. You will need to decide what’s going to support the engine when you drop it – I used a dolly. It makes things a lot easier!
1. Start with your basic stuff. Get your car on the lift, remove the wheels, disconnect the battery (8mm), and pull off your fuel rail covers.
2. Hook up an a/c machine to recover the refrigerant.
3. Underneath your car, on the lower right hand side of your radiator, you will see a petcock valve. Put your catch pan underneath, and open the petcock valve. It takes about a half hour or more for all of the coolant to trickle out of that tiny hole, so we’ll give it a head start while we work on some other stuff.
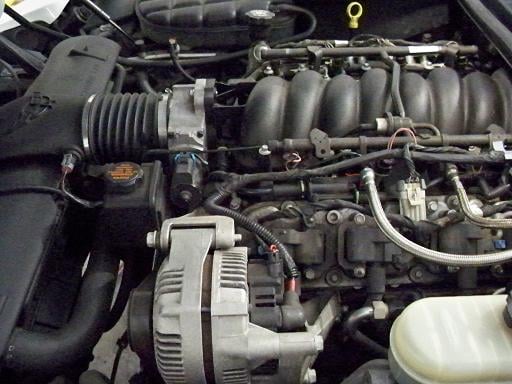
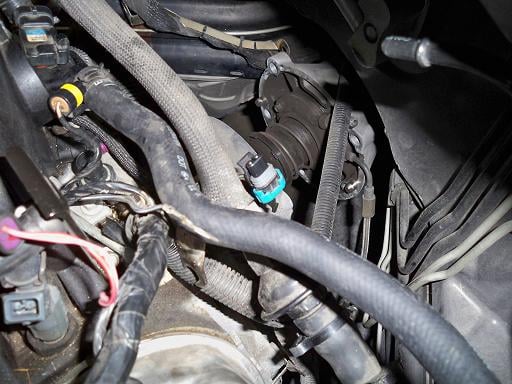
4. Now you can begin unplugging connectors. Anything you find attached to your engine, take it off. To name a few, you will need to unplug the following sensors; IAT, MAF, TPS, fuel injectors, camshaft position sensor, oil pressure sending unit sensor, MAP, coil packs, alternator, etc. Basically follow the harness from the front of the air intake as it snakes along the engine, and take everything off. The harness will also have a couple push pin type clips holding it to the fuel rail – pull those out too. You can lay your harness over your windshield to get some more room. You will most likely still run into connectors as you get through the rest of this – just undo them when you see them. There are also two places where the wiring harness grounds to the back of the cylinder head – remove the 15mm bolts (or wait until later on when you begin to drop the engine, there will be more room).
5. Remove the rubber hose attached to the brake booster (it goes to the back of the intake).
6. Make sure the steering wheel is secure in the car, i.e., do not turn it after this step. Disconnect the steering shaft from the rack, it is one 13mm bolt and it is on tight. Once the bolt is out, simply pull the shaft off and let it flop off to the side.

7. Undo the air bridge in front of the throttle body. You can either use a socket or a flathead screwdriver. I took the entire assembly out from air box to throttle body, since it is really only two clamps. Disconnect the vacuum line in the air intake tubing.
8. Remove the black plastic shroud that covers the radiator fans & condenser. There are 2 10mm bolts on each side, and then it lifts off.
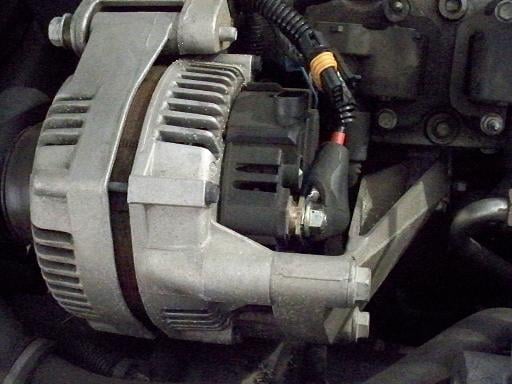
9. On the back of the alternator, there is a black rubber boot. Pull it back to access a 13mm nut, remove that and take off the thick red wire. There is also a rose bud clip underneath the alternator that holds more of the wiring harness, be sure to disconnect that.
10. Remove the main serpentine belt by depressing the belt tensioner (15mm). Set aside.
11. Remove the alternator. There are four bolts attaching it to a bracket, two long ones in the front and two short bolts in the rear. The alternator most likely won’t just fall out, it needs a bit of gentle coercing from a pry bar.
12. After removing the alternator, remove the alternator support bracket by loosening the final 15mm bolt.
13. Unplug the coolant temp sensor at the front of the driver’s side cylinder head, if you haven’t already.
14. On the end of your fuel rail, you will see a cap. Remove the cap, and using a screwdriver and a rag, depress the schrader valve within to release the fuel pressure. Don’t spray yourself in the face.
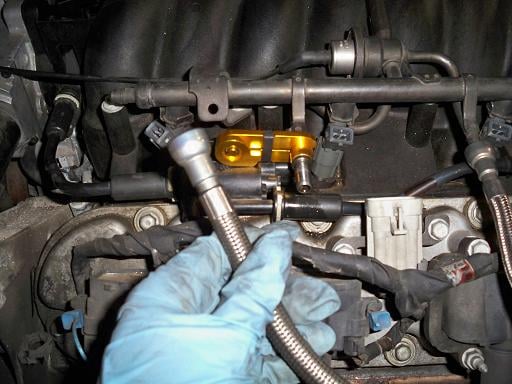
15. Using a fuel line disconnect tool, disconnect the fuel lines running to the fuel rail. Mine’s a ’97, a return style fuel system, so I have two lines. Newer C5’s just have one. When you disconnect them, swivel them out of the way and tie a rag around the end so it doesn’t drip on your engine bay.
16. Disconnect your AIR system hard lines. They are on both exhaust manifolds, and have 2 10mm bolts each. You can then disconnect the soft AIR line that runs from the fitting on the driver’s side manifold to the front of the car (to the air box). Then you can pull the whole thing off and set it aside.
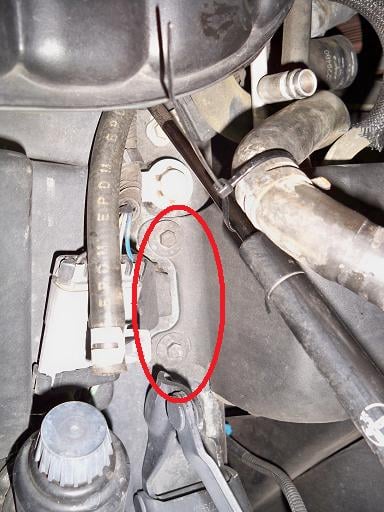
17. Under the brake booster, there is a ground strap with a 10mm bolt on a stud. You can disconnect it here, or you can disconnect it via a 15mm bolt attached to the engine block later on, your choice.

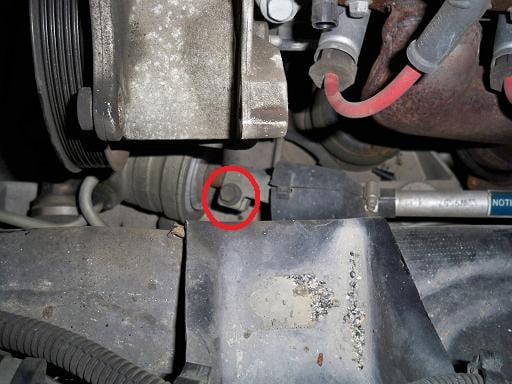
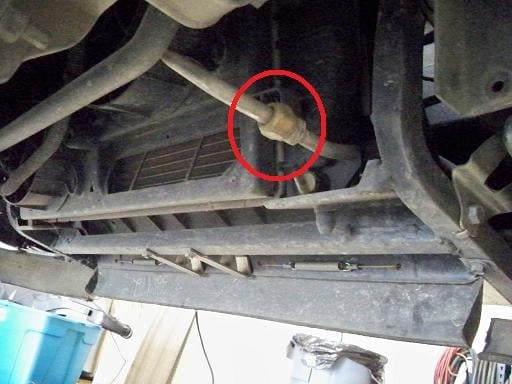
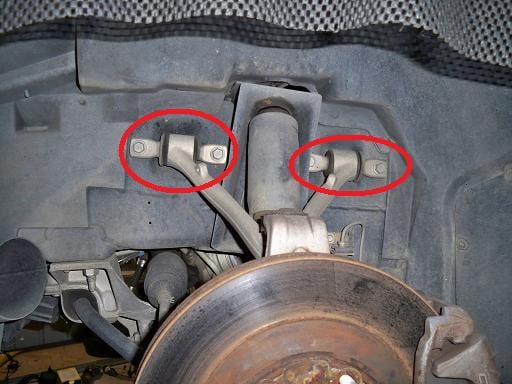
18. Disconnect the wheel speed sensors on both front wheels. You will find the connector on the cradle. If you don’t see it, just follow it from the speed sensor to the car until you run into it. Also, there is a connector at the front of the cradle, near the steering rack (pictured), be sure that is disconnected, and make sure it is free of any rosebud clips.


19. Hopefully by now most of your coolant has drained out. This next step will make a mess regardless, so keep your catch pan handy. Tighten the petcock valve in the radiator (so it doesn’t continue to drip). Remove the upper radiator hose entirely (doing so will allow us to take out the fan assembly later on with less fuss). Disconnect the lower radiator hose at the engine only, swivel it out of the way. Then disconnect the hoses running to the water pump. There is one final line that runs from the bottom of the throttle body to the radiator, disconnect it at the TB.
20. Now you should have a good view of the a/c compressor on the passenger side. There is a connector going to the compressor, disconnect it (it has a prong on either side of the sensor, fyi).

21. Detach the a/c line from the firewall on the passenger side, it is a 13mm nut. Pull the line off the stud.
22. Detach the a/c line from the condenser, under the passenger side of the car. The nut is 24mm, the other side of the line is 20mm. The nut just unscrews.

23. Underneath the car, remove the post cat oxygen sensors. They are 7/8ths, and you can let them hang when you’ve unscrewed them.
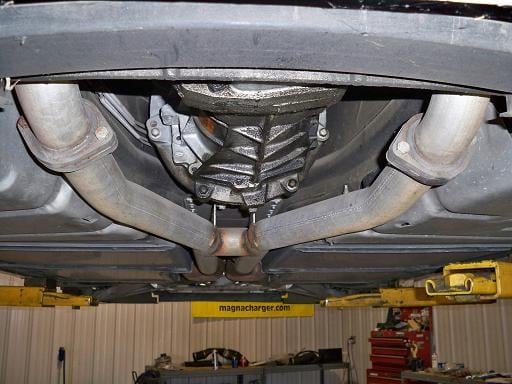
24. At this point, remove your exhaust. Remove the 15mm bolts connecting the mufflers to the x-pipe. The mufflers can stay with the car. Then remove the 15mm nuts connecting the x-pipe to the exhaust manifolds, there are three per side. These are always rusty and on there pretty good – don’t be surprised if one or two break. It’s not a bad idea to hit these nuts with some PB blaster a few hours before you try and undo them.

25. Now you can take down the x-pipe. Have someone support the x-pipe, and remove it from the spring hangers (15mm) and then from the rear of the bellhousing (2 14mm bolts). Slip it off of the exhaust manifold studs and it comes right down.
26. If you look up now, you will see approximately 1,000 8mm bolts staring you in the face. Ok, so maybe it’s not 1,000, but there are a ton of these little things holding up the torque tube brace. Remove all of them.
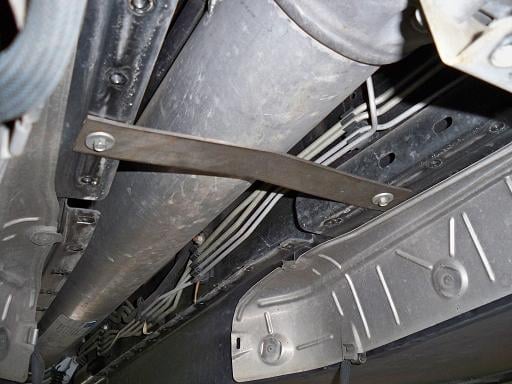
27. Since I dropped the engine first, I wanted something to support the torque tube. I used two of the 8mm bolts and a thin strip of steel to make a brace beneath the tube.
28. While you’re still under the car, remove any connectors you may have missed. You can leave the pre cat oxygen sensors in the manifolds, just obviously disconnect them from the harness. Double check that you got the speed sensors. Disconnect the radiator fans (2 plugs) and unclip the rosebud clips to free the harness.

29. Disconnect the starter. There is 1 13mm nut and one 8mm nut. Once those wires are out of the way, you will see a ground wire attached to the block (15mm bolt), take that off. Behind the starter is the crankshaft position sensor, disconnect that. Feed the wiring harness back up towards the top of the car so it is not caught on any components underneath.
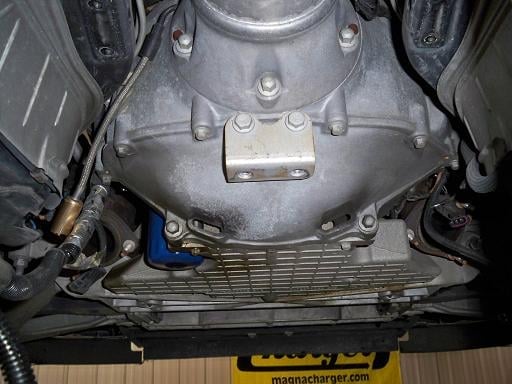
30. On top of the oil filter is the oil temperature sensor, disconnect that also.

31. Disconnect the clutch line. You will see a white plastic ring, push that ring into the fitting and pull apart. It’s called a quick disconnect fitting, but not for good reason, as it can be a pain to remove.
32. Disconnect the brake lines at the caliper, there is a 13mm bolt fitting. There are two copper washers, one on each side of the brake line. DO NOT REINSTALL THE LINE LATER ON WITHOUT BOTH!!! The brake lines will stay with the body of the car.
33. Now we can detach the engine from the rest of the drivetrain. You need to remove the 5 13mm bolts holding the torque tube to the bellhousing. The bellhousing is held to the engine with 6 13mm bolts. Check it out – you can either take these bellhousing bolts out now, or you can do it later when we begin dropping the engine from the car (recommended). The top bellhousing bolts take a creative amount of extensions and universals to get to. It is necessary to take them out because they are attached to the wiring harness. But, like I said, you can wait to do this later when we have more room.
34. Detach the swaybar mounts from the car (you do not need to disconnect it from the end links). I think it was 2 13mm bolts per side.

35. At this point you need to detach the front suspension from the body. There are several ways to do this, but what worked for me was disconnecting the shock and the upper a-arms. I like to use a transmission jack/deadman/etc to depress the suspension a bit, it will make removing it easier if the weight of the brake rotor/hub is not dragging it down. First detach the shock. If you put your hand on the top of it, you will feel a 15mm nut. Slide your gear wrench on the nut, and then use your allen wrench to hold the shock still (there is a recess for it at the top). When the nut comes off, there is a metal shim and rubber bushing beneath it, grab those now so you don’t lose them during the engine drop.
36. Remove the upper a-arms from the car. There are 4 15mm bolts per side, and chances are there is a shim or two between the arm and the body. Don’t lose them, and remember which bolt they went with! I just screwed mine back into the body after detaching the a-arm, that way I knew where they came from.
37. Now you can remove the trans jack/deadman/etc and let the suspension come down. The a-arm will hang loosely, the shock will start to come down out of its mount.
38. Back to the top of the car. Pull the radiator fans out. They are not held in with any bolts, they just slide into clips. If you pull up and out, you will dislodge them from their clips. I took out the fans so that I had room to slide my engine forward.
39. Do a final check, twice!! Look for anything connecting the engine to the body, and disconnect it.

40. Align your dolly or jack under the engine cradle. There are four 21mm nuts that attach the cradle to the body, be sure to not place your dolly/jack so that you cannot get to these. Lower the car onto your dolly, and remove the nuts (2 per side, 21mm). There is nothing big holding your engine to the car anymore, so you need to be really careful and attentive from here on out.

41. Inch your lift up slowly. Every time you raise it, get back under the car and make sure nothing is getting hung up. The a/c lines/steering shaft will need a little guidance to avoid getting stuck.
42. Now that the body is starting to inch off the engine, you will have more room to get to the top bellhousing bolts/cylinder head grounds – if you have not taken them off already, do so now. Make one more pass over the engine and see that the harness is totally free of it. You don’t want to have to replace a bunch of obscure connectors because they got caught!!
43. The engine will now need to slide forward roughly 6″ to clear the input shaft. It takes a bit of jimmying, a bit of persuasion to get it loose. My bellhousing was detached from the engine and the torque tube, and I left it resting on the torque tube so I could get the engine out.
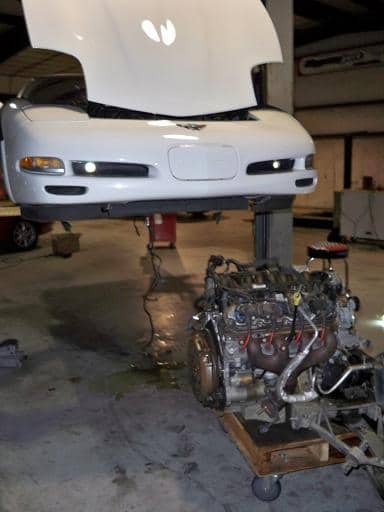
44. Once the engine is free of the input shaft and everything else, raise the car up the rest of the way, and revel in your glory…you’ve just removed your engine!