
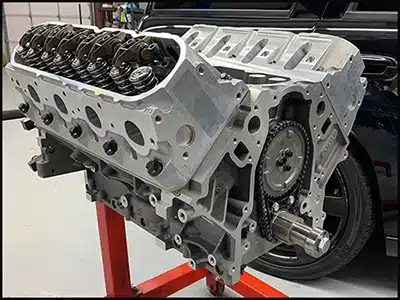
A few notes before starting – a standard cam install includes not only the cam, but also installing valve springs and hardened pushrods at the very least. Most cams will require a tune to run also, and larger ones will also require fuel injectors to avoid maxxing out the stock injectors. It is best to check with your vendor and make sure you have all of the necessary parts before getting started. Here at PCM of NC, we have developed several cams that are excellent performers for the Trailblazer SS. They are listed HERE in our camshafts category.
Other standard things that should be replaced during a cam install include the front timing cover gasket, front timing cover seal, timing chain, harmonic balancer bolt, water pump gaskets, oil pump o ring, and valve cover gaskets. If you have a 2007+ TBSS you will also need a 3 bolt cam conversion kit. We have developed cam kits to supply the supporting parts you need, check them out HERE. If you have a high mileage vehicle, you may consider replacing the oil pump and or water pump as well since they have to come off anyway. You will also want to have coolant, transmission fluid and oil/filter ready for your install.
This how-to is intended as a guideline only. You are ultimately responsible for your own installation.
- Disconnect battery.
- Recover air conditioning refrigerant.
- Drain coolant. TBSS’s don’t have a petcock valve on the radiator; you will have to disconnect the lower radiator hose to drain the coolant.
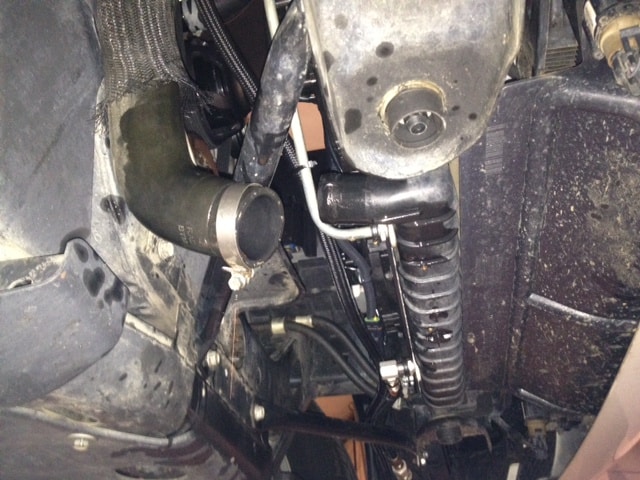
Lower radiator hose disconnected
- Remove the trim on the top of the headlights. It consists of 7mm bolts and pushpins.
- Remove front grille. The grille snaps into place with pushpins. Use caution when pulling it out as to not break it or the plastic support that it plugs into.
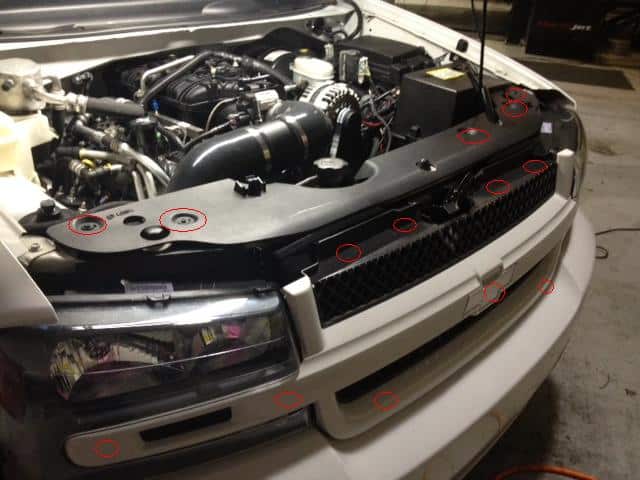
Grille & Top Trim Pushpin/bolt locations circled
- Remove battery tie down bracket. Two 10mm bolts hold it to the fender and the radiator support; one 10mm nut secures the bracket over a stud.
- Remove air intake from throttle body. This will vary depending on what intake you have – but generally you want to give yourself enough room to work so take off as much as you need to.
- Unplug all of the sensors/etc at the top of the engine. This includes a 15mm ground on the passenger cylinder head, the MAF, TPS, MAP, fuel injectors, coil packs, alternator, a/c pressure switch, evap, etc. Once everything is unplugged, carefully fold the harness over to the driver’s side and tuck it out of the way.
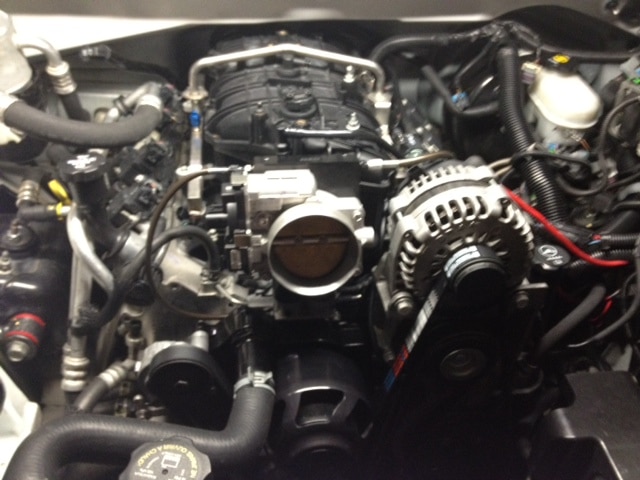
Engine harness disconnected and pushed out of the way
- Remove PCV hose from driver’s side valve cover.
- Remove top radiator support bar. There will be two 13mm bolts holding the radiator bracket to the bar (on the top, looking down) and also one 13mm bolt at the very bottom of the bracket (near the bumper) that will come out from the back. Then, remove the four 13mm bolts holding the radiator support to the body of the truck and set it aside.
- The hood catch/latch bracket assembly can be swiveled out of the way towards the battery.
- Remove main belt (15mm ratchet on the tensioner to release). Also remove A/C belt (3/8 drive extension into a/c tensioner to release).
- Remove upper radiator hose. Easier to just disconnect it altogether from radiator and water pump than leave it attached to the water pump.
- Remove two heater lines going into water pump. Also, remove bracket that holds heater lines to valve cover (10mm). Push out of the way.
- Remove fan and shroud, either mechanical or electric.
- Remove water pump. Stock pumps have six 10mm bolts. Meziere electric water pumps use six allen head bolts
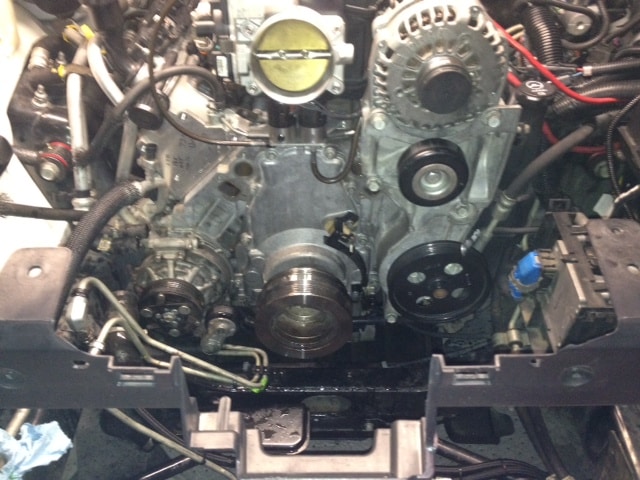
Front of motor exposed, ready for pulley removal
- Remove transmission lines from radiator. Push black plastic retaining clip backwards, and use a small pick to fish out the locks. Once the lock is out the line will pull right out.
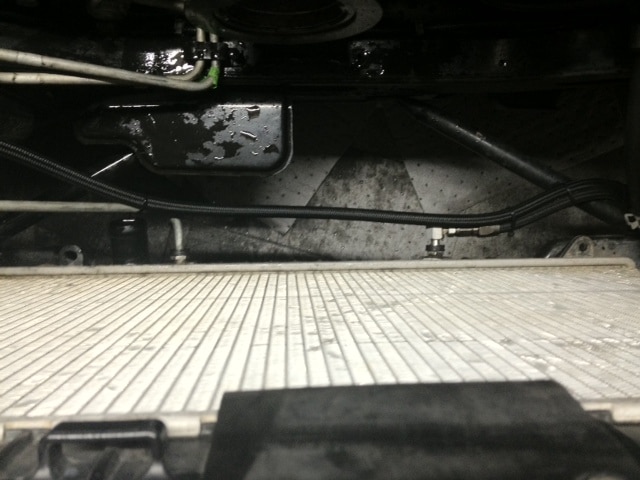
Transmission lines running into radiator
![]()
How to remove transmission line clips
- Disconnect a/c lines from the passenger side of the condensor. One is at the top, one is on the side, both are 13mm. Be careful to a) not lose the o-rings and b) not make a mess with the a/c oil that will leak out. Swivel lines out of the way.
- Radiator and condenser will come out as one assembly.
- Remove harmonic balancer. Bolt is 24mm. With a stock balancer, you can use a three jaw pulley to remove (place pulley on inner part of balancer, do not pull from outside!) With a powerbond, you will want to use the three threaded holes on the inside of the pulley with a steering wheel/crows foot puller.
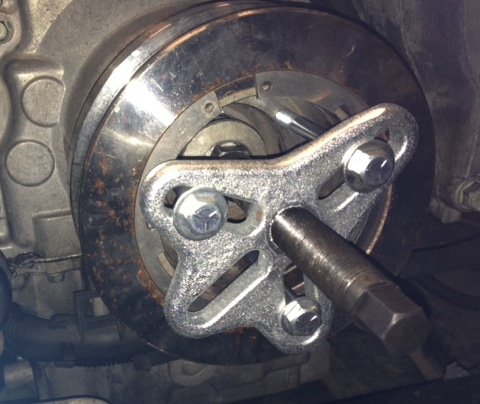
Removing a Powerbond balancer with a puller
- Disconnect spark plug wires from coils.
- Remove coil packs from valve covers. Coil packs are on one bracket and need not be removed individually. Remove coil pack bracket bolts only – there are five 10mm bolts with studs poking out of the top on each valve cover.
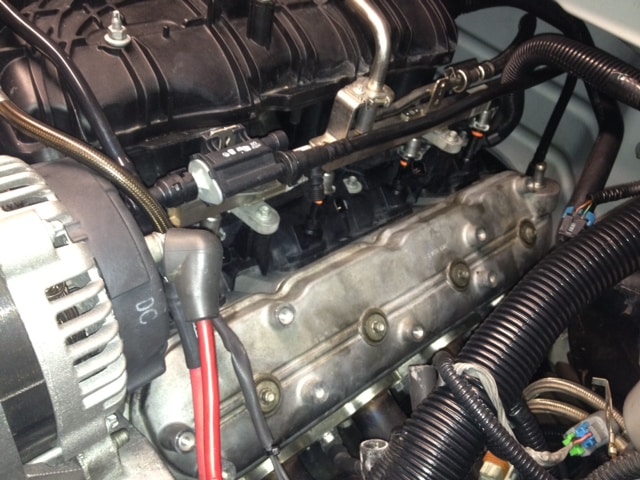
Valve Covers ready for removal
- Remove valve covers. Four 8mm bolts.
- Remove rockers. Also 8mm bolts. Use an impact socket to remove these. They will break chrome sockets every time. Rocker/pedestal can come out as one assembly (handle the pedestal at either end). Set aside.
- Pull pushrods out.
- Make a decision on how you wish to install your valve springs. There are a couple ways to retain the valves. One is the top dead center method. Simply put whichever cylinder you are working on at top dead center. When the valve spring is removed, the valve will only be allowed to fall so far before it hits the piston. You can do two cylinders at a time this way as two will always be at TDC at the same time. Another method is to use a tool that plumbs shop air into the spark plug hole (after you remove the plug). This pressurizes the cylinder, forcing the valves to stay up.
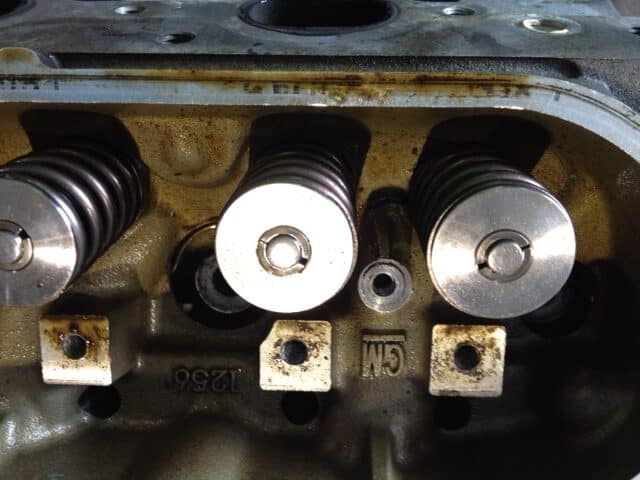
Valve Springs ready to come off (note: shown springs are aftermarket)
- There are valve spring tools available from Comp/Crane that make quick work of installing. It is worth the money! It allows you to do two valve springs at one time. Essentially, it bolts onto the head, and you wrench it down which compresses the valve springs. Note, before tightening it down, place a punch on the top of the valve and give it a little hit with the hammer. This will help break the locks from the valve. As the spring compresses, the locks should loosen/fall off.
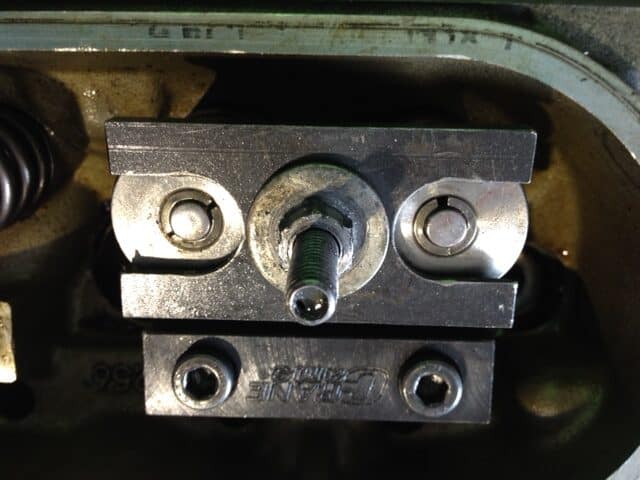
Crane Valve Spring Tool installed onto springs.Tighten the 1/2″ nut to compress the springs and remove the locks.
- Remove the spring tool, and the valve springs. There will be a valve seal on each valve that can be pulled off gently with pliers. Under the valve seal is a metal valve seat, pull that off and replace with the new one. When installing the new valve seal, wipe a small amount of oil around the mouth before placing it over the valve. Be sure that it seats evenly. Using a deep socket as a seating tool, lightly tap the valve seal onto the valve. Tap on gently until it is fully seated.

- Install valve springs over valve, and install retainers on top of springs. Reinstall spring compressor. Tip: dab a small amount of assembly lube or petroleum jelly onto the valve locks, and press them into place at the top of the valve. This will loosely ‘glue’ the locks to the valve so they don’t fall off as you loosen the tool. Loosen the spring compressor slowly, making sure the spring comes up well centered. When fully seated, remove compressor tool.
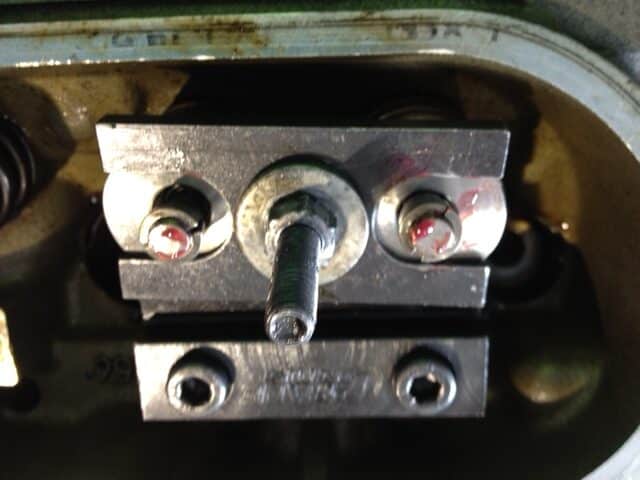
Assembly lube on valve locks is very helpful!
- Repeat process for all valve springs.
- Moving back to the front of the motor, unplug the cam sensor from the front of the timing cover (you don’t need to remove the bolt retaining it). Remove the timing cover itself. There are several 10mm bolts lining the perimeter, and also two 10mm bolts going up into it through the oil pan. It is easier to remove the bottom bolts if you first remove the harness running across the front of the oil pan. It has one 10mm bolt holding it to the pan – remove that and pull the harness down and out of your way.
- After you pull the timing cover off, you will be looking at the timing set up. The top gear with the three bolts is the cam gear (1 bolt cams will be in 07+). The crank gear is located behind the oil pump. Unless you are retarding/advancing the timing via the crank gear, you do not need to remove it. NOTE: It is highly suggested to replace the timing chain no matter the mileage of the vehicle. It is cheap insurance. We typically use OEM LS2 timing chains.
- Remove the cam gear from the cam. This will either entail a) removing the three 10mm bolts (2006 TBSS) or b) removing the single bolt (2007+ TBSS). Once the gear is loose you can pull it forward and slip the timing chain off of it.
- If you are replacing the chain (recommended) you must remove the oil pump. The oil pump is held on with four 13mm bolts and is also attached to the oil pump pickup tube via one 10mm bolt underneath.
- The four 13mm bolts on the pump will be easy to remove. The oil pickup tube bolt requires some creative thinking to remove and reinstall. For one thing, you are dealing with very limited space. Some people prefer to loosen the oil pan and let it hang to allow easier access to the bolt. I prefer to use a special wrench on it. It is a normal 10mm wrench that has been shaved down so that it is thinner, it also helps to heat it and put a small bend in it to reach the bolt easier.
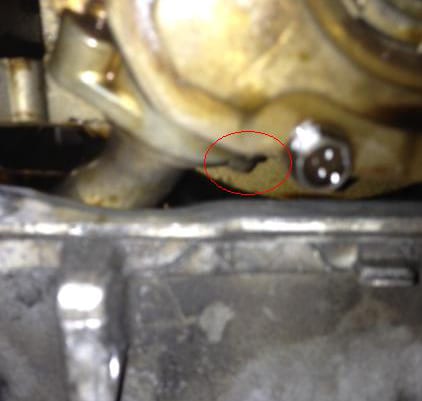
Oil Pickup tube bolt location
- If you drop the bolt in the pan, you most likely will have to remove the pan to retrieve it (not fun). A way to avoid this is to put a small zip tie around the bolt threads once it has backed out enough to do so. This way when you have the bolt totally loose you don’t have to worry about dropping it. Once the bolt is out, pull the oil pump forward while pushing down on the pickup tube to remove it.
- With the oil pump off you can remove the timing chain.
- Remove the cam retaining plate. It has four T-40 bolts. NOTE: these are usually very tight. Clean the bolt heads first with brake clean so your tool won’t want to slip off (they are very easy to strip if you are not careful). Insert your torx socket into the bolt, and give it a firm tap with a hammer before attempting to remove it (or just use an impact driver to break it loose).
- Now you are ready to remove the cam. If you have an ’06, you can thread two or three water pump bolts into the cam to give you something to hold on to as you pull it out. With the ’07 you can thread the single bolt in. Keep in mind, the lifters rest on the cam. You will need to spin the cam quickly a few times in either direction to push the lifters up and off of it. In the block above the cam, you will see two holes on either side. After you spin the cam in both directions, you can insert something in these holes to help hold the lifters in place. It is not a fail-safe but it helps. Some companies make aluminum tools just for this purpose. You can also use a thin piece of rubber vacuum hose. Whatever you use, lubricate/dunk it in oil first so it will slide in smoothly. If you start inserting it and it jams or gets stuck, remove it and spin the cam a few more times before reinserting.
- Have your new cam ready to install before pulling your old one. Cleaning the new cam is very important as it will have machining oil/possible trash or grit on it. In a clean room, spray it down very well with brake clean, inside and out. After it dries, lay it on a clean piece of plastic and douse it with engine oil or assembly lube.
- With your lifter tools of choice installed, remove the cam. The cam itself rides on the cam bearings in the block and has several lobes on it that are controlling the opening and closing of the valves. Twist the cam in a counter clockwise motion while pulling outwards and supporting the front of it. You are trying to get the lobes to clear the cam bearings (they will want to hang up). Go SLOW and be patient. If you are rough you will only cause yourself internal damage. Continue twisting and pulling gently until it is completely out. Note: you will need to remove the water pump/etc bolts from the front of it when it is about halfway out to give yourself enough room to pull it forward.
- The new cam will go in the same way. This time, twist clockwise and push slowly towards the back of the motor while supporting the cam. You will have to insert it at just the right angle to avoid hanging up on the cam lobes. Just go slow and you will be fine.
- When your cam is installed, remove your lifter tools.
- Reinstall cam retaining plate, loctite bolts and torque to 18 ft/lbs.
- Slip the new cam gear into the timing chain and over the crank gear. There is a dot on the crank gear and a “u” shape on the cam gear. These must line up. The easiest way to do this is to line them up with them seated in the timing chain, and then attach the cam gear to the cam itself. The cam will have three bolt holes and a dowel on it, and the dowel will insert into the dowel hole on the gear. You can turn the cam over by the dowel with your finger until everything is lined up correctly.
- Attach the cam gear to the cam via the three bolts once the timing is lined up dot to dot. Hand tighten bolts so there is no slack. Using old harmonic balancer bolt, turn over crank several times to verify that you are dot to dot with your timing. If timing is correct, remove and reinstall cam gear bolts with loctite. They should be torqued to 18 ft/lbs.
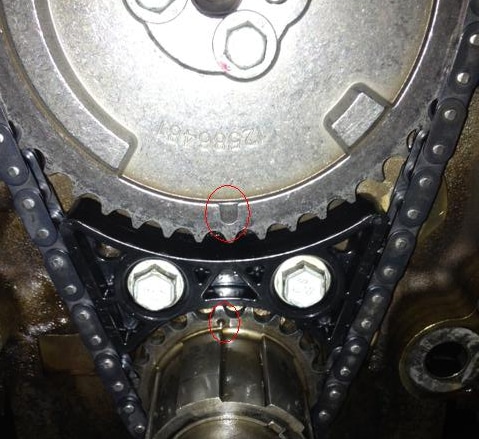
Cam Gear & Crank Gear installed dot to dot
- Reinstall oil pump. Replace the pickup tube o-ring while you have this apart. Coat liberally in oil or assembly lube before reinstalling. Take caution when seating the pickup into the oil pump. If you pinch or tear the o-ring, you will lose oil pressure and have to tear down your front end again.
- Reinstall 13mm oil pump bolts and also the pick up tube bolt. Using a zip tie again will help (make sure you have enough room to snip it off later).
- Now you can reinstall the timing cover. If you are replacing the seal, now is the time to do it. Knock the old one out and seat the new one using a hammer and a block of wood (to keep it even and flush) until seated.
- Put a small dab of RTV on the bottom corners where the oil pan will meet the timing cover. Reinstall timing cover with gasket. LOOSELY thread all of the timing cover bolts. Do not fully tighten/torque timing cover bolts until completing step 51 or you risk damaging the seal and having oil leaks.
- Reinstall harmonic balancer. Seat it on the crank snout, and use a slightly longer bolt with the same thread as the stock one. There are also installer kits that use a bearing for the bolt to ride on, these are nice and will help prevent damage to the threads in the crank. Using the bolt or tool, seat the pulley fully. Remove bolt/tool and install old crank bolt. Torque to 240 ft/lbs. Remove old bolt, install NEW bolt. Tighten to 37 ft/lbs. Then, tighten bolt another 140 degrees.
- Now you can torque down the timing cover bolts to 18 ft/lbs. These should be tightened in a star type pattern (as you would any other auto application).
- Plug in cam sensor. Reinstall engine harness to front of oil pan.
- With the front cover buttoned up, you can now finish the valve train. Clean new hardened pushrods, and then bathe in oil. Slip pushrods back into holes and gently push down on them (since lifter may be stuck up). Once pushrods are seated, reinstall rocker arm and pedestal. Hand tighten all bolts. Moving in a star pattern from the center rockers to the outer ones, torque to 22 ft/lbs. Turn crank over 180 degrees, recheck torque. Repeat on other side.
- Reinstall valve covers (good time to replace seals if needed) torque bolts to 106 inch/lbs.
- Reinstall coil pack brackets, reconnect spark plug wires.
- Reinstall water pump (use new gaskets) and also reconnect water hoses (heater hoses and upper radiator hose).
- Reinstall a/c belt and main serpentine belt.
- Reinstall radiator and condensor. Reconnect A/C lines (be sure the o rings are still on the lines) and also transmission lines at bottom of radiator. Before pushing metal retainer clip back into transmission lines, bend tightly with your hand to tighten it back up in case it was bent during removal.
- Reinstall electric or mechanical fan.
- Reinstall hood latch/catch assembly, as well as upper support brace.
- Lay engine harness back over intake manifold and reinstall all connectors except for coil packs. Don’t forget the ground on the passenger side head.
- Reinstall air intake (plug in MAF/etc).
- Reinstall PCV hose from valvecover to intake manifold.
- Recharge a/c system.
- Reinstall battery tie down.
- Reinstall top trim panel.
- Reinstall front grille.
- Reinstall lower radiator hose and radiator overflow hose.
- Refill coolant system. The easiest way to do this without an air pocket is to remove the small hose going into the top of the passenger side cylinder head coolant fitting. With that hose removed, add coolant to the radiator. Coolant will eventually bubble out of the coolant nipple on the head. Block that off with a vacuum cap and continue to fill until coolant also comes out of the hose that you pulled off of said nipple. Once fluid comes out of both ends, reinstall hose and clamp. Top radiator off and also coolant reservoir. You will want to recheck the coolant after starting/a drive cycle.
- You will also want to add transmission fluid once the vehicle is running (must be measured in park, warmed up). Don’t forget. Usually a quart or so will spill out when you removed the transmission lines.
- Reconnect battery and fire engine. Leaving the coil packs undone will allow the vehicle to turn over without actually firing. This gets the oil moving around in the engine so it is not a completely dry fire.
- After a few moments of firing without coils plugged in, reconnect coils and start engine. Watch oil pressure gauge like a hawk. If you do not have oil pressure almost immediately, cut engine off and investigate. Most likely causes are a pinched or cut o-ring. You do not want to run the engine without oil pressure.
- If all is well, allow vehicle to heat up to operating temperature. Keep an eye on coolant, tranny fluid, etc. Basically keep checking the vitals as it warms up.
- Once vehicle has reached operating temperature, it is good practice to shut it down and change the oil.