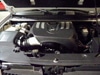
Trailblazer SS (6.0L LS2) Intake Manifold Install
Tools needed:
3/8” drive ratchet
Extensions
4mm, 8mm, 10mm, 15mm socket
Pliers
Flat tip screw driver
Fuel line disconnect tool
Rag
-
Disconnect the battery (8mm)
-

-

-
-
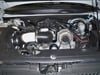
When you are finished unplugging everything, there is a 10mm nut that holds down a plastic bracket to the top of the intake manifold. Once you remove the nut, you can lay the engine harness over to the driver’s side, just make sure it is out of your way.
-
-
Also remove the PCV hose going to the top of the intake.
-
On the passenger side fuel rail there is a cap with a Schrader valve beneath. Put your rag on top and depress the valve core with the screwdriver to release the built up fuel pressure (don’t get it in your eyes).
-
-
Disconnect the brake booster vacuum hose at the brake booster by depressing the clamp with pliers. Route the hose in front of the engine harness.
-
All that is left are 10 8mm bolts holding the intake on. Remove these.
-
Double check no wiring harnesses/etc is still connected, if not, you can remove the intake. You will need to maneuver it slowly around the alternator/cylinder heads, make sure it doesn’t get hung up on anything.
-
-
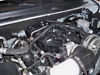
Remove the throttle body from the stock intake by loosening 2 10mm bolts and 2 10mm nuts. You will need to transfer the top studs to the new intake; you can loosen them by using a 4mm socket on the end.
-
Don’t forget your throttle body gasket. If your new intake does not have one, pry the old one out and reuse it. Then reinstall the throttle body.
-
Transfer over the MAP sensor (top of intake), the brake booster line (pulls right off the back). Also you will need to swap over the bracket that holds your engine cover on, it has 2 10mm bolts.
-
You can reuse your stock gaskets. They snap on to each side in three locations, and pop right off. Simply transfer to new intake.
-
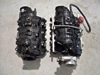
Swap the fuel rail by removing the 4 8mm bolts that hold it on. Once loosened, pull up gently and the injectors will pop out. When transferring, make sure to seat all the injectors and then retighten the 4 8mm bolts.
-
Now it’s ready to go back in. Guide it gently in, it should be obvious when it is seated, but just make sure you are not pinching any wiring harnesses/etc.
-
Reinstall the 10 8mm bolts, in a star pattern, starting in the middle. (I need to get the torque specs). Do not go crazy torquing them down, or you will strip out the holes. Torque to GM specs.
-
Reconnect the braided fuel line to the fuel rail, reinstall the metal lock.
-
Reinstall the EVAP solenoid into the bracket, and reconnect the EVAP line onto the top of the manifold.
-
Reconnect the PCV line to the top of the manifold.
-
Route the brake booster hose behind the engine wiring harness, and reconnect at booster.
-
Lay the wiring harness back over the engine, and reconnect everything you disconnected, starting on the driver’s side. Do not forget to replace the 15mm ground bolt on the passenger side head. Reinstall the plastic bracket to the manifold with the 10mm nut.
-
Reinstall your intake.
-
Reconnect the battery.
-
Replace engine cover.